命令模式
本文共 2070 字,大约阅读时间需要 6 分钟。
说明
本文转载自:
命令(Command)
介绍
命令模式(Command Pattern)是一种数据驱动的设计模式,它属于行为型模式。请求以命令的形式包裹在对象中,并传给调用对象。调用对象寻找可以处理该命令的合适的对象,并把该命令传给相应的对象,该对象执行命令。
Intent
将命令封装成对象中,具有以下作用:
- 使用命令来参数化其它对象
- 将命令放入队列中进行排队
- 将命令的操作记录到日志中
- 支持可撤销的操作
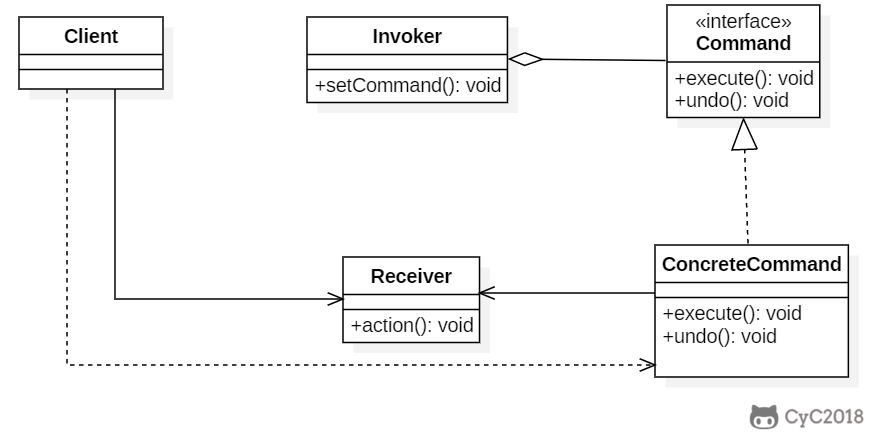
Class Diagram
- Command:命令
- Receiver:命令接收者,也就是命令真正的执行者
- Invoker:通过它来调用命令
- Client:可以设置命令与命令的接收者
Implementation
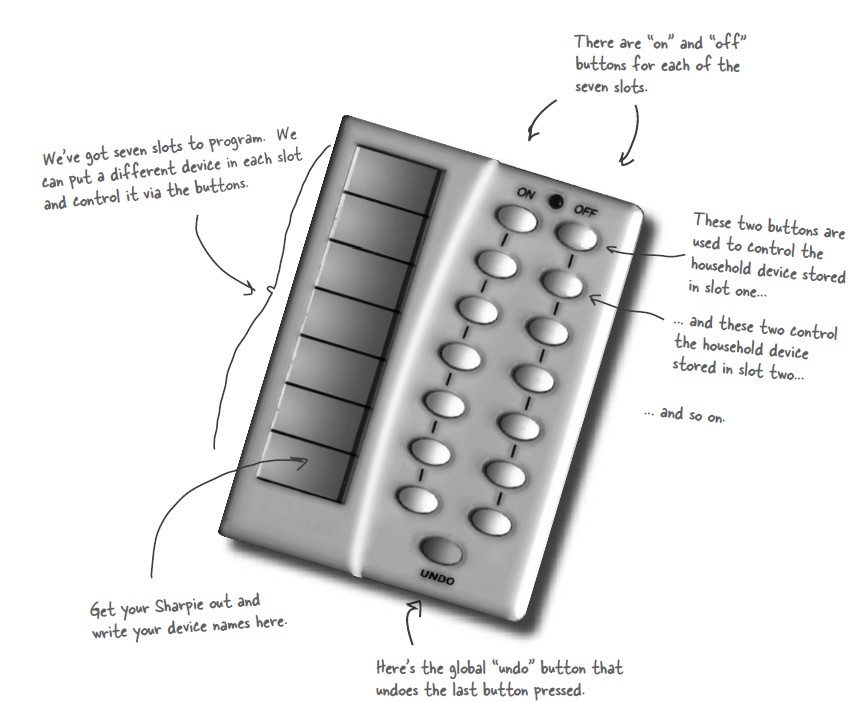
设计一个遥控器,可以控制电灯开关。
public interface Command { void execute();} public class LightOnCommand implements Command { Light light; public LightOnCommand(Light light) { this.light = light; } @Override public void execute() { light.on(); }} public class LightOffCommand implements Command { Light light; public LightOffCommand(Light light) { this.light = light; } @Override public void execute() { light.off(); }} public class Light { public void on() { System.out.println("Light is on!"); } public void off() { System.out.println("Light is off!"); }} /** * 遥控器 */public class Invoker { private Command[] onCommands; private Command[] offCommands; private final int slotNum = 7; public Invoker() { this.onCommands = new Command[slotNum]; this.offCommands = new Command[slotNum]; } public void setOnCommand(Command command, int slot) { onCommands[slot] = command; } public void setOffCommand(Command command, int slot) { offCommands[slot] = command; } public void onButtonWasPushed(int slot) { onCommands[slot].execute(); } public void offButtonWasPushed(int slot) { offCommands[slot].execute(); }} public class Client { public static void main(String[] args) { Invoker invoker = new Invoker(); Light light = new Light(); Command lightOnCommand = new LightOnCommand(light); Command lightOffCommand = new LightOffCommand(light); invoker.setOnCommand(lightOnCommand, 0); invoker.setOffCommand(lightOffCommand, 0); invoker.onButtonWasPushed(0); invoker.offButtonWasPushed(0); }} JDK
你可能感兴趣的文章
Netty基础—5.Netty的使用简介
查看>>
Netty基础—6.Netty实现RPC服务一
查看>>
Netty基础—6.Netty实现RPC服务三
查看>>
Netty基础—7.Netty实现消息推送服务一
查看>>
Netty基础—7.Netty实现消息推送服务二
查看>>
Netty基础—8.Netty实现私有协议栈一
查看>>
Netty基础—8.Netty实现私有协议栈二
查看>>
Netty多线程 和 Redis6 多线程对比
查看>>
Netty学习总结(1)——Netty入门介绍
查看>>
Netty学习总结(2)——Netty的高性能架构之道
查看>>
Netty学习总结(3)——Netty百万级推送服务
查看>>
Netty学习总结(4)——图解Netty之Pipeline、channel、Context之间的数据流向
查看>>
Netty学习总结(5)——Netty之TCP粘包/拆包问题的解决之道
查看>>
Netty学习总结(6)——Netty使用注意事项
查看>>
Netty实现Http服务器
查看>>
Netty客户端断线重连实现及问题思考
查看>>
Netty工作笔记0001---Netty介绍
查看>>
Netty工作笔记0002---Netty的应用场景
查看>>
Netty工作笔记0003---IO模型-BIO-Java原生IO
查看>>
Netty工作笔记0005---NIO介绍说明
查看>>